4 October 2026
PiHole, Unifi & Proton VPN
Intro
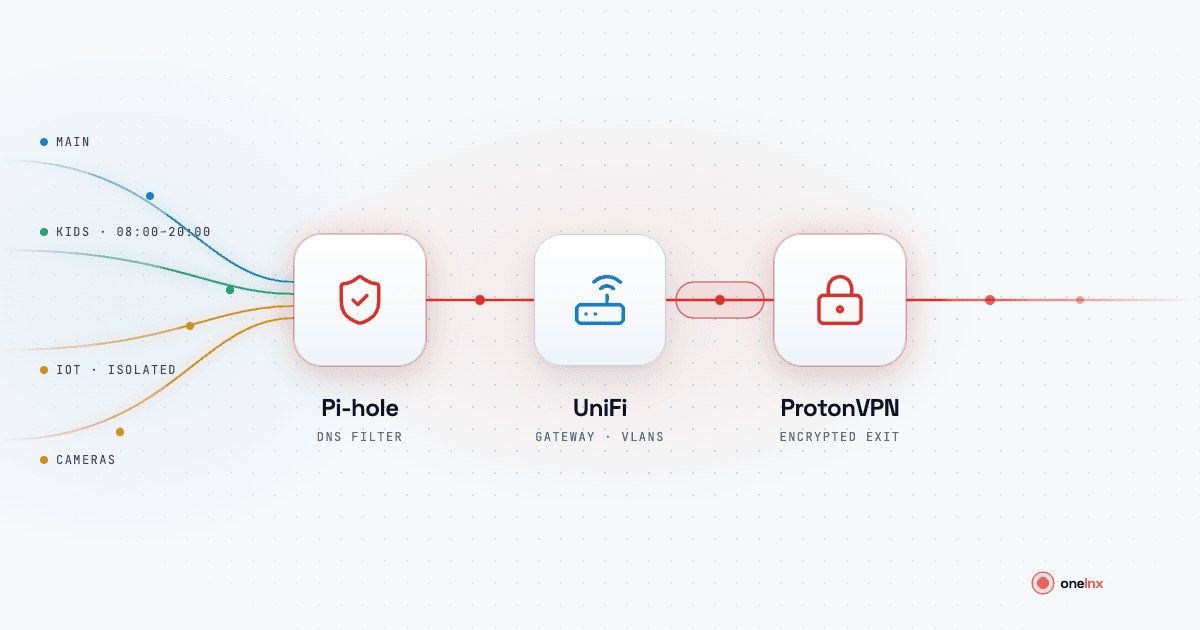
My home network is divided into 4 sub-networks:
- Main
- Kids
- IoT
- Surveillance
The purpose of separating my home network is to grant me maximum control over how devices on my network behave. For example, the Kids network can only access the internet between 8am to 8pm. The IoT network cannot directly access any other networks without explicit network rules.
All sub-networks use the same DNS server which is run by PiHole which then routes traffic through the Proton's VPN DNS server and then through the default gateway as follows:
This provides multiple layers of network protection:
- All 'dodgy' DNS queries are dropped by PiHole
- Further DNS filtering and ad-blocking occurs at the VPN DNS
- Lastly all traffic exiting my home is via an encrypted tunnel through the VPN.
Configuration / Setup
The following setup needs to happen in order to achieve this design:
- Installation and configuration of PiHole
- Custom network DNS configuration
- Configuration and installation of VPN client in Unifi
- Update PiHole's upstream DNS Server
1. Installation and configuration of PiHole
PiHole needs to be downloaded and installed onto your network see https://pi-hole.net/ There are many options on how to install PiHole, I have blogged on an approach here: https://www.onelnx.com/blog/configuring-pihole-and-unifi-for-dns
2. Custom network DNS configuration
In Unifi at the network settings page /network/default/settings/networks you need to go to each network and set the DNS Server to the IP address of the server where PiHole was installed:
 Also you should have a firewall rule for each subnet to prevent the use of any other DNS servers. Thus ensuring that all devices only use the PiHole server.
3. Configuration and installation of VPN client in Unifi
You need to go into your Proton VPN account and navigate to the downloads page: https://account.protonvpn.com/downloads
Use the WireGuard configuration to create a .conf file that can be imported into Unifi. Follow each step and select a server which is close to you that supports IPv6 and has a low load amount.
Export that configuration and go back into Unifi network overview network/default/settings/settings_overview and click Create New under VPN Client
Select the following options in the configuration dialog:
- WireGuard as the connection type
- File as the Setup and upload the file
- Associate all of the internal networks with this policy / route
4. Update PiHole's upstream DNS Server
Lastly, PiHole needs to be configured to use the DNS server from proton. The DNS server IP used by the Proton VPN will be available in Unifi as a result from step 3.
Go into PiHole's DNS settings admin/settings/dns and remove all other selected IPs and type the Proton's VPN IP into the custom DNS servers box, and save. 🎉
Latency / Speed Examples
My current broadband package gives me 500Mbps down and 40Mbps up. Below are some examples of the speed tests that I've run using this setup:
Unifi Router
From the Unifi router I'm getting 550Mbs down and 53Mbps up.
fast.com
From fast.com I'm getting 530Mbs down and 42Mbps up.
Benefits / Consequences
Here are some general benefits / consequences of using this approach to secure your home network traffic
Benefits
- The entire house is secured behind a VPN not an individual device.
- All devices use PiHole hence all 'dodgy' DNS queries are blocked before reaching the internet.
- Because the VPN is at the router level no split tunnelling is needed.
- Actual location & IP will be masked for all devices.
- All traffic is hidden from the ISP.
- Proton's Malware, Ads & Trackers protection works across all devices (inc. Smart TVs).
Consequences
- If a VPN server is experiencing high load levels this will impact your latency
- Some services / devices such as Amazon & Google use processes which may result in either blocking the service completely or allowing the service including tracking, ads etc.